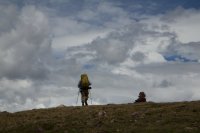
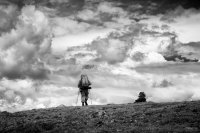
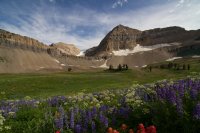
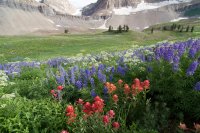
Album Photo Processing Comparisons

Nick

-
.
Joined
Aug 9, 2007
Messages
12,949
The recent discussion about the role post-processing plays in photography got me thinking it would be really cool to have an album here where people post the straight-out-of-the-camera (SOOC) version of a photo along side the processed version. This will be especially fun for photos that turned out good after processing but not necessarily that great before.

I realize that a lot of people might be hesitant to 'show their hand' by posting a before and after shot of some of their best work, so maybe just post some of your so-so stuff? And there's no obligation to tell us how you processed if you want to leave it a mystery....

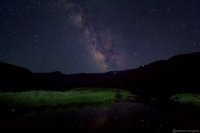
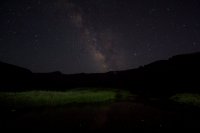
Here's the before and after of my Milky Way shot at Stough Creek Lakes from this past weekend. This one took a lot of processing...

SOOC:
IMG_0112 (1).jpg

Processed version:
IMG_0112.jpg
 
Cool idea. It would be a lot better IMO if the poster explained the work flow, how they arrived at the final image, software etc.
Greg
 
Good thread! I agree with Greg. Obviously no one wants to give away all of their secrets, but it would be nice to know what the process is on some of these. I only know a few basics of photo editing that I've taught myself, but I would love to learn a few new techniques.
 
Good thread! I agree with Greg. Obviously no one wants to give away all of their secrets, but it would be nice to know what the process is on some of these. I only know a few basics of photo editing that I've taught myself, but I would love to learn a few new techniques.

The only really important thing is to shoot in raw. Without that you are mostly SOL. With it, the door is wide open.
 
The only really important thing is to shoot in raw. Without that you are mostly SOL. With it, the door is wide open.

I've been wanting to give raw a try. While reading up on how to do it, I've read so many contradictory articles about it. Some of the authors insist it makes a big difference, while others say it really doesn't. That would be a good comparison set for this thread. Raw vs. JPEG. Would anyone care to contribute a set of pictures?
 
Cool idea. It would be a lot better IMO if the poster explained the work flow, how they arrived at the final image, software etc.
Greg

I started off in LR4 and messed around with the exposures and contrast to get the two images to match up as closely as possible. I followed that with WB correction, a saturation bump, and a light grad filter on the sky. I exported the two images from LR4 as TIF files and tired to get he image to match up manually in CS5..... That really didn't work out so I backtracked a bit and used the auto photomerge feature. Then it was back to LR for a slight clarity bump, more tone curve adjustments, and a bit of sharpening.

phew.
 
I've been wanting to give raw a try. While reading up on how to do it, I've read so many contradictory articles about it. Some of the authors insist it makes a big difference, while others say it really doesn't. That would be a good comparison set for this thread. Raw vs. JPEG. Would anyone care to contribute a set of pictures?

So I've never shot RAW+JPG, so don't have any sets of the same image shot both ways. But I just took a quick look at the pictures I uploaded this morning for my Uintas BP trip report and found a couple that might be helpful.

These were both taken with my S100. The first one, shot in JPEG:

IMG_0940W2.JPG


And even that, isn't exactly "SOOC" (straight out of camera). I bumped up the contrast a little bit while resizing it for upload.

This is the same scene, taken within minutes of the above, but shot in RAW and "developed" in ACR (Adobe Camera RAW).

IMG_0948_W2.JPG


I did a heavy curves adjustment for the sky, bumped up the vibrance and clarity for the rest, then increased the saturation on just yellow and blue a bit for the whole image.

Looking at it now, after resizing etc., I'd back off some of the saturation and vibrance, but, still I think it looks a lot better than the JPEG version of the same scene taken within minutes of this one.

Edit to add a third image. This one was taken in JPEG, shortly after the RAW image above and has more of the same scene elements than the first JPEG. With this one you can see how dramatically differen the sky and foreground came out with the RAW version. Note - I said "different than", not "better than" - the point being to illustrate the flexibility RAW gives you, not highlight how weak I am at utilizing that flexibility!

IMG_0965W2.JPG


One more thing I'd add... I do most of my RAW conversions using DPP, the free software that comes with all Canon cameras that shoot RAW. If you bought an Sxxx Canon new, it came with a disc you can install DPP from. It lacks some nice features that ACR and LR have, but it's dead simple easy and fast to use and still yields superior results to shooting JPEG in my opinion.

- DAA
 
I did a heavy curves adjustment for the sky, bumped up the vibrance and clarity for the rest, then increased the saturation on just yellow and blue a bit for the whole image.

Looking at it now, after resizing etc., I'd back off some of the saturation and vibrance, but, still I think it looks a lot better than the JPEG version of the same scene taken within minutes of this one.- DAA

That's impressive! Looking at the middle shot I would have thought it was HDR (good HDR, not bad, overprocessed HDR). I think I'll be trying raw sooner rather than later.
 
I want to put in my $.02.
I really like the idea for this thread, one of the reasons I enjoy being a member of backcountrypost is the opportunity I have to learn from the many knowledgeable people here. I have already learned a ton about photography and backpacking.

This spring I purchased an Apple iMac and Adobe Lightroom 4. At that time I started shooting everything in RAW and processing in LR4. It is amazing what can be done with LR4 I have been able to take a photo that I would have deleted and turned it into a keeper. The full version of LR4 is $150 and I think you can get the student edition for around $80, well worth the money.

In this picture I had the camera set to spot meter on the water and made the picture way under exposed.
Before.jpg

In this photo I used LR4 to adjust the exposure, contrast, and bring out the detail in the shadows.
After.jpg

I regret that I didn't start shooting RAW long ago. I believe that everyone should save a RAW file even if they don't currently have the ability to post process, you can always come back to them at a later time.
 
The recent discussion about the role post-processing plays in photography got me thinking it would be really cool to have an album here where people post the straight-out-of-the-camera (SOOC) version of a photo along side the processed version. This will be especially fun for photos that turned out good after processing but not necessarily that great before.

I realize that a lot of people might be hesitant to 'show their hand' by posting a before and after shot of some of their best work, so maybe just post some of your so-so stuff? And there's no obligation to tell us how you processed if you want to leave it a mystery....

Here's the before and after of my Milky Way shot at Stough Creek Lakes from this past weekend. This one took a lot of processing...

SOOC:
View attachment 4397

Processed version:
View attachment 4398
Nick, I would like to see what you did to the sky to bring out the Milky Way.
 
Can we have a gallery where we admit to overbaking photos? I feel like I do that a lot.

When I started getting into photography I fell in love with HDR (common trap). Now I can't stand the look of most tone-mapped images. I'm more impressed by photos that show the photographer had to think about the dynamic range of the scene during composition. Stuff that I shoot with range beyond the limits of the image sensor, I now blend by hand in Photoshop.
 
When I started getting into photography I fell in love with HDR (common trap). Now I can't stand the look of most tone-mapped images. I'm more impressed by photos that show the photographer had to think about the dynamic range of the scene during composition. Stuff that I shoot with range beyond the limits of the image sensor, I now blend by hand in Photoshop.

This is exactly where I am at, too
 
The full version of LR4 is $150 and I think you can get the student edition for around $80, well worth the money.

Did a quick search on amazon. They have the retail version for $125 and the student version for $60.

I've never taken any photos in raw... Ok, that's not true, I took 2 or 3 this winter when I got a camera that was capable of shooting in raw. I messed with it and not knowing much I wasn't able to do much with it so I never messed with it again. Now that I see what a difference it can do I'm going to start shooting raw + jpg! I gotta get me LR4 though.
 
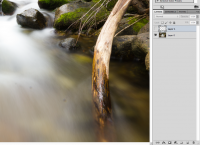
Here's a quick and dirty example of how post processing a raw image can help provide some pop. I'm by no means a professional and this is not meant to indicate the "right" way of doing things... only the method by which I currently process most shots.

Start with the unprocessed raw file.
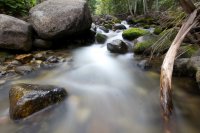
Example unprocessed2.jpg

It's okay, not great. There are some dust or water specks visible in the foreground. The background is a little cluttered and overly bright. The highlight in the center of the image is blown out. Enter Adobe Camera Raw.
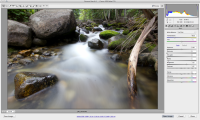
Screen Shot 2012-08-15 at 8.31.15 PM.png

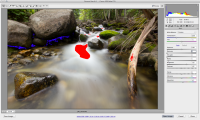
Looking at the histogram in the upper right-hand corner, I can see both the highlights and shadows clipped. The first step is too add a bit of saturation and even out the highs and lows. ACR allows us to find out exactly where the trouble areas are. I'm also going to warm the image by touching up the white balance.
Screen Shot 2012-08-15 at 8.32.38 PM.png

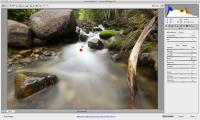
Since the overall exposure isn't out of whack, I'm going to ignore the exposure, brightness and contrast controls. Instead, I'll use a bit of recovery to tame the highlights and pull back on the blacks to reveal the shadows.
Screen Shot 2012-08-15 at 8.33.00 PM.png

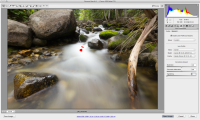
The goal here isn't to go overboard, just to dial in enough correction to mitigate the problems. Now on to lens correction. The Canon EF-s 10-22mm exhibits some distortion at 10mm, as well as some faint chromatic aberration. ACR has a built-in profile for this lens and will correct for both problems with a single click. I've added the vignetting back in because it is subtle and adds to the image, in my opinion.
Screen Shot 2012-08-15 at 8.33.23 PM.png

Next, I'll set up some capture sharpening. This is what your camera does when shooting JPG. Done right, the effect will be subtle. Sharpening isn't so much about fixing blurriness but instead increasing the overall "crispness" of the image. More dramatic sharpening effects can be had later in the process. Likewise, I've added a touch of luminance denoising. Since this was shot under decent light at ISO 100, there's little noise with which to contend.

Screen Shot 2012-08-15 at 8.33.47 PM.png

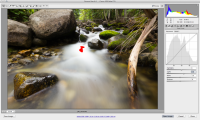
Now to the curves. Beautiful curves. This is where a lot of the magic happens. We're going to tweak the contrast here a bit by bumping up the lights and darkening the darks. Notice that while this has improved contrast, it hasn't pushed our highlights or shadows into oblivion again. A soft touch.
Screen Shot 2012-08-15 at 8.35.14 PM.png

Another great way to tweak contrast or bring out some emotion is by manipulating the individual colors. By boosting or cutting saturation of single colors (as opposed to the whole image) we can highlight specific parts of the image.

Screen Shot 2012-08-15 at 8.36.13 PM.png

The same works for luminance (the bright/dark balance of the color). A tip for dramatic skies: boost the blues while also drawing down their luminance.

Screen Shot 2012-08-15 at 8.36.27 PM.png

So far our edits have been global. But ACR and other RAW processing tools also allow for non-destructive spot correction by way of the Adjustment Brush. That's this guy.

Screen Shot 2012-08-15 at 8.36.50 PM.png

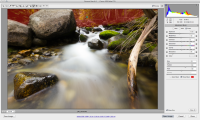
Remember where I said the background was messy and overly bright? Now we're going to fix that by selectively darkening and blurring the offending areas.

Screen Shot 2012-08-15 at 8.40.47 PM.png

Using the brush, paint in the areas to be affected by the settings you choose. The Adjustment Brush and it's cousin the Graduated Filter tool are very powerful. You can see the portions of the image to be impacted using the mask.
Screen Shot 2012-08-15 at 8.41.22 PM.png

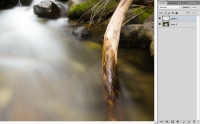
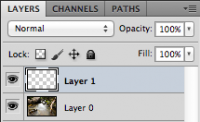
At this point, the image is fairly presentable. You could save out a version and it would be okay. But there are a couple little additions to be made in Photoshop. Open the image in PS. It has several good tools for dealing with those nasty gray spots, but I go the old school route and use the clone stamp. Place the clone on a new layer so as not to ruin the underlying layer with a bad clone job.
Screen Shot 2012-08-15 at 8.42.11 PM.png

Before correction...

Screen Shot 2012-08-15 at 8.43.45 PM.png

...and after. Good improvement.

Screen Shot 2012-08-15 at 8.43.59 PM.png

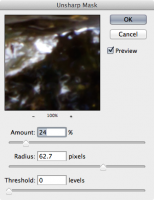
Now for some more sharpening. This is where sharpening can be a bit creative. I want to highlight the foreground elements by using some local contrast adjustment. Unsharp Mask is a great tool for this.
Screen Shot 2012-08-15 at 8.44.55 PM.png

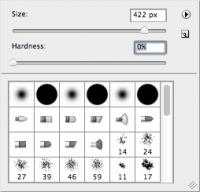
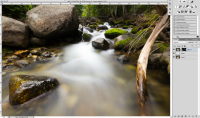
I'll paste Layers 1 and 0 together into a new layer and apply the filter, then use a mask to blend it in just where it's needed. Use a large brush with little to no hardness so that the effect feathers off nicely. Also, a low opacity with multiple strokes will help make sure it's subtle and blended well.
Screen Shot 2012-08-15 at 8.45.27 PM.png

Take a look at the mask on the layers panel to see how I've only drawn the sharpening in on specific parts of the image (white is where the effect is applied).
Screen Shot 2012-08-15 at 8.47.27 PM.png

Now we're really getting some depth to the picture. I'd consider this presentable. Sometimes though, a little burning and dodging can really bring things together. In order to do this non-destructively, I'll use new layers with the overlay blending mode and paint on them as if they were masks.

Screen Shot 2012-08-15 at 8.48.07 PM.png

Screen Shot 2012-08-15 at 8.48.58 PM.png

Finally, just a hint of final contrast adjustment using a curves adjustment layer. This is not always necessary if I nailed it earlier in ACR. I usually use PS's linear contrast preset, then dial down its strength using layer opacity.

Screen Shot 2012-08-15 at 8.50.48 PM.png

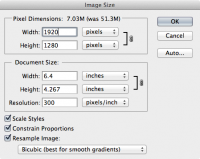
Up to this point, we've been editing a very large file. By working in 16-bit, we've ensured that color gradients remain smooth and free of posterization. But web graphics are 8-bit so we'll step that down... and resize to a more web-friendly (or at least desktop background-friendly) size.
Screen Shot 2012-08-15 at 8.51.38 PM.png

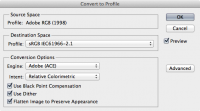
Personally, I like editing in Adobe RGB color space because of its wider gamut. But many browsers will fail to render this properly, so I'll swap to sRGB as a final step before saving a web-friendly version.
Screen Shot 2012-08-15 at 8.51.56 PM.png

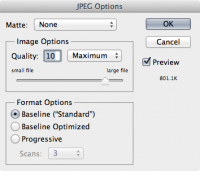
JPG that sucker and we're done.

Screen Shot 2012-08-15 at 8.52.26 PM.png

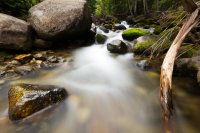
Our image weighed in at a scant 800k. Now for the finished product.
Example.jpg

Compare again to the original, unprocessed file.

Example unprocessed2.jpg

Now upload the masterpiece to Flickr or your web service of choice and obsessively refresh, wondering why it's not racking up hundreds of hits.
 
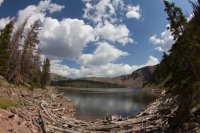
Here's a shot from my trip this past weekend(trip report to come) to the Fish Lake, Uintas area. First one is RAW SOOC and the second is processed. I use LR4 with a Photomatix Pro plugin. Photomatix is an HDR program. It has various blending options which allows you to make the pictures look really HDR or just subtle HDR. My shots are not true HDR because instead of shooting a bracketed sequence on my camera I just make three copies of the RAW file, expose one for the midtones, one for the highlights, and one for the shadows and then export from LR to Photomatix Pro via the plugin. Choose the settings I want in Photomatix Pro. Export back into LR4, and then tweek to my liking. It sounds a little complex but it only takes me about 5 mins per picture.
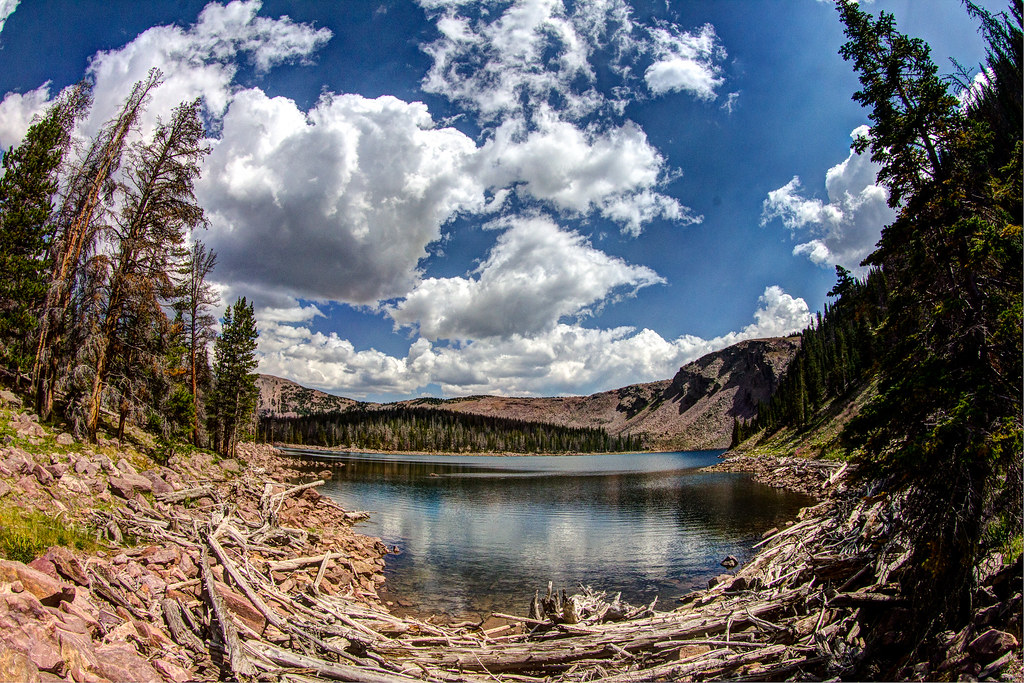
IMG_6834.jpg


Clouds over Fish Lake by Deadeye008, on Flickr

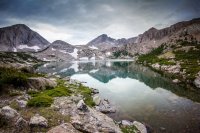
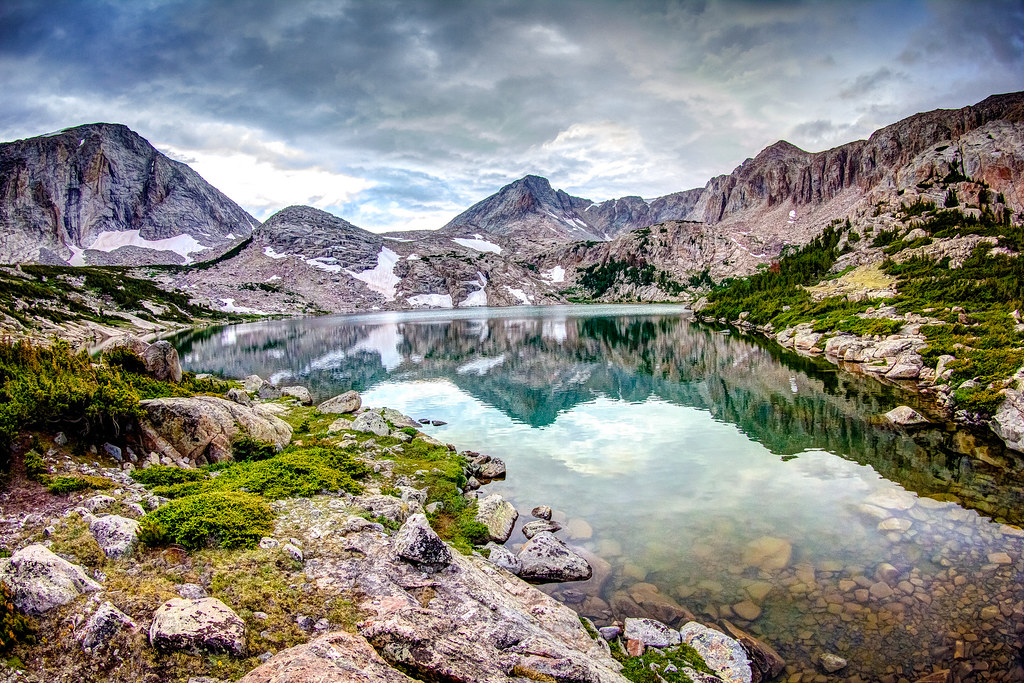
Another example from my Wind River trip

SOOC
IMG_5910-2.jpg


IMG_5910__.jpg by Deadeye008, on Flickr

IMG_6165.jpg


IMG_6165__.jpg by Deadeye008, on Flickr
 
Similar threads
Thread starter Title Forum Replies Date
SteveR Got photo calendars? Let's see them! Photography 14
NorthwestWanderer My annual 4K Timelapse photo film Photography 2
Burrito Never-ending growing photo collection at the top of my daily hike... General Discussion 22
Rockskipper Weather.com photo contest Photography 0
Rockskipper Surviving In The Wild: Can Your Photo Gear Save Your Life? Photography 1
Ross Photo highlights from an old Utah trip Everything Else 7
Henk Affinity Photo for Windows Photography 0
gnwatts Photo show Photography 3
Nick Photo Books Photography 17
Vegan.Hiker The "Caption this Photo" thread General Discussion 35
DesertXJ Milky way photo settings Photography 61
Jeremy C The South Saskatchewan Photo Run Photography 4
Laura Outdoor Photographer Photo of the Day Photography 3
Blaine 6 million for Az. photo! Photography 13
Laura My tent shot is the featured photo for Best of May 2014 Photography 8
Laura I've got a photo in Outdoor Photographer! Photography 5
Laura Grand Canyon Photo Hunt Photography 11
Duke Where are the top 25 Landscape photo locations Photography 13
Duke Redundant Photo/Video backup Photography 5
Laura Photo Theft Photography 37
Laura My first published photo! Photography 13
Laura Outdoor Photographer Photo of the Day Photography 5
Nick September Photo of The Month - Vote Now! General Discussion 9
Nick Photo storage Photography 34
Duke Best photo sharing site? Photography 6
NateGeesaman Nick's photo in a BBC travel article General Discussion 2
Archbishop Get credit for your photo. General Discussion 1
OldBill Tool for tent comparisons - useable space Gear 0

Similar threads

Back
Top