- Joined
- Aug 9, 2007
- Messages
- 12,959
I've had a lot of people ask how I shoot star trails so I thought I'd post up a little tutorial here. I won't claim to be the expert on this, but I've done it enough to know my way around.
Equipment needed:
- A digital SLR Camera
- A sturdy tripod
- A wired remote control trigger
The wired trigger can be an intervalometer or a plain old trigger. It cannot be a wireless remote. I usually use my Canon RS60 or sometimes my cheap no-name Intervalometer. Anything like that will do, just make sure it has the right connection for your camera. I don't know much about Nikon gear but the Canon cameras have two different connections. Most use a 2.5mm headphone style jack but the pro cameras like the 5D and 1D use a special proprietary connector.
Now that we have the equipment figured out, lets discuss the methods. There are two different ways I use to take photos of star trails.
1. Single Exposure Method
The old school way is with a single long exposure. This was the only way to do it with film cameras and is still the only way to get decent results if there are any clouds in the sky. I rarely ever shoot star trails like this.
Here are the settings I would typically use for a single-exposure star trail. Most of them can and should be tweaked for various conditions so play around and try different things.
- Manual Focus: Infinity
- White Balance: Daylight
- Image Stabilization: OFF
- Quality: RAW
- Aperture: As fast as your lens allows, typically f/4 or lower
- ISO: Variable depending on ambient light. For a single exposure you'll get best results with an ISO in the 100-400 range. Anything higher than ISO 400 and you won't be able to leave the shutter open long enough without over exposing. You'll also have major noise issues.
- Shutter Speed: Set it to bulb and lock down the wired trigger. You'l get movement in your stars at any exposure beyond 30 seconds but to get a real trail effect you'll need to leave it open for more like 5-45 minutes.
Here are some examples and the settings I used for single exposure star trails:
38 minutes, ISO 100, f/3.5
The foreground was illuminated by our nearby campfire. Little to no moonlight.

14 minutes, ISO 500, f/3.5
There was lightning striking on the horizon, hence the yellow glow. Also notice the gaps in the trails caused by clouds.

11 minutes, ISO 160, f/3.5
A half moon was lighting up the landscape nicely.

21 minutes, ISO 400, f/3.5
The light on the horizon is the glow from nearby Logan, Utah which was not visible at all to the naked eye. This was kind of a fun result from turning up the ISO. The gaps in trails are from thin clouds.

2. Multiple Exposure Method (aka Stacked Trails)
There are many benefits of shooting your star trails with multiple exposures. You can get more stars, darker skies, less noise and more interesting foreground possibilities. It's almost as easy too. it just takes a bit more work once you're back at your computer.
Here are the settings I would typically use for a multiple-exposure star trail. Just like single-exposure, most of them can and should be tweaked for various conditions.
- Manual Focus: Infinity
- White Balance: Daylight
- Image Stabilization: OFF
- Drive: Continuous, so that your camera will take one picture after another when the trigger is locked down.
- Quality: JPEG Large, you can shoot in RAW but it is going to kill your card/disk space fast.
- Aperture: As fast as your lens allows, typically f/4 or lower
- ISO: I typically use an ISO between 800 and 2000 for multi-exposure trails. Try test shots until you get something that looks good with the light you have.
- Shutter Speed: 30 seconds
Once you have all your settings dialed in, lock down your trigger and the camera will start taking back-to-back 30 second exposures. At the beginning and/or end of the sequence, I like to play with various ways of illuminating or light painting the foreground. I feel that one of the most important parts of a cool star trail photo is a nice foreground, otherwise the trick can get old fast. A speed light, head lamp, flashlight, campfire, firesteel or any other light source can be used to paint the foreground, be creative.
Let the camera run for as long as you wish. Shorter times will of course make shorter star trails. If you let it go too long, you can always choose how many of the images to use in the final product, making the trail as long or as short as you would like. You can also choose which of the painted foregrounds to use in the final image.
Back on your computer, you'll need some software to stack the images. My favorite is a free program called StarStax which is available for Mac, Windows and Linux.
Make any necessary adjustments to your images then load the images you want to use into StarStax and compile them into one image. You'll probably want to make more adjustments to the stacked image. This is also a good time take your best foreground image and layer it in using photoshop. The possibilities are endless.
Here are some examples of stacked star trail images and my approximate settings.
f/3.5, ISO 1600, 16 minutes
I used magnesium firesteel to illuminate the rocks.
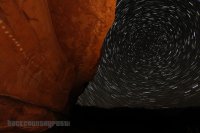
f/3.5, ISO 400, roughly 30 minutes
There was a full moon rising over my shoulder, hence the lower ISO. The light streak in the foreground is my headlamp as I walked through the last 30 second exposure.
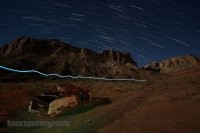
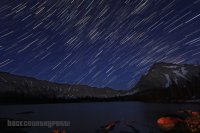
f/3.5, ISO 1000, roughly 30 minutes
I started this while the sky was still just a little light after sundown to get the blue effect. There was no moonlight yet.
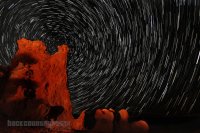
f/3.5, ISO 2000, roughly 30 minutes but I actually let it run for more like 2.5 hours. I just chose a smaller number of frames for the final image. The light on the rocks is from our nearby campfire.
With all those extra frames, it can be fun to make a time lapse. But that's a whole different tutorial.
Please feel free to add your tips and techniques and point out anything I might have overlooked.
If you'd like a printable version of this tutorial to take with you, download the attached PDF:
Equipment needed:
- A digital SLR Camera
- A sturdy tripod
- A wired remote control trigger
The wired trigger can be an intervalometer or a plain old trigger. It cannot be a wireless remote. I usually use my Canon RS60 or sometimes my cheap no-name Intervalometer. Anything like that will do, just make sure it has the right connection for your camera. I don't know much about Nikon gear but the Canon cameras have two different connections. Most use a 2.5mm headphone style jack but the pro cameras like the 5D and 1D use a special proprietary connector.
Now that we have the equipment figured out, lets discuss the methods. There are two different ways I use to take photos of star trails.
1. Single Exposure Method
The old school way is with a single long exposure. This was the only way to do it with film cameras and is still the only way to get decent results if there are any clouds in the sky. I rarely ever shoot star trails like this.
Here are the settings I would typically use for a single-exposure star trail. Most of them can and should be tweaked for various conditions so play around and try different things.
- Manual Focus: Infinity
- White Balance: Daylight
- Image Stabilization: OFF
- Quality: RAW
- Aperture: As fast as your lens allows, typically f/4 or lower
- ISO: Variable depending on ambient light. For a single exposure you'll get best results with an ISO in the 100-400 range. Anything higher than ISO 400 and you won't be able to leave the shutter open long enough without over exposing. You'll also have major noise issues.
- Shutter Speed: Set it to bulb and lock down the wired trigger. You'l get movement in your stars at any exposure beyond 30 seconds but to get a real trail effect you'll need to leave it open for more like 5-45 minutes.
Here are some examples and the settings I used for single exposure star trails:
38 minutes, ISO 100, f/3.5
The foreground was illuminated by our nearby campfire. Little to no moonlight.

14 minutes, ISO 500, f/3.5
There was lightning striking on the horizon, hence the yellow glow. Also notice the gaps in the trails caused by clouds.

11 minutes, ISO 160, f/3.5
A half moon was lighting up the landscape nicely.

21 minutes, ISO 400, f/3.5
The light on the horizon is the glow from nearby Logan, Utah which was not visible at all to the naked eye. This was kind of a fun result from turning up the ISO. The gaps in trails are from thin clouds.

2. Multiple Exposure Method (aka Stacked Trails)
There are many benefits of shooting your star trails with multiple exposures. You can get more stars, darker skies, less noise and more interesting foreground possibilities. It's almost as easy too. it just takes a bit more work once you're back at your computer.
Here are the settings I would typically use for a multiple-exposure star trail. Just like single-exposure, most of them can and should be tweaked for various conditions.
- Manual Focus: Infinity
- White Balance: Daylight
- Image Stabilization: OFF
- Drive: Continuous, so that your camera will take one picture after another when the trigger is locked down.
- Quality: JPEG Large, you can shoot in RAW but it is going to kill your card/disk space fast.
- Aperture: As fast as your lens allows, typically f/4 or lower
- ISO: I typically use an ISO between 800 and 2000 for multi-exposure trails. Try test shots until you get something that looks good with the light you have.
- Shutter Speed: 30 seconds
Once you have all your settings dialed in, lock down your trigger and the camera will start taking back-to-back 30 second exposures. At the beginning and/or end of the sequence, I like to play with various ways of illuminating or light painting the foreground. I feel that one of the most important parts of a cool star trail photo is a nice foreground, otherwise the trick can get old fast. A speed light, head lamp, flashlight, campfire, firesteel or any other light source can be used to paint the foreground, be creative.
Let the camera run for as long as you wish. Shorter times will of course make shorter star trails. If you let it go too long, you can always choose how many of the images to use in the final product, making the trail as long or as short as you would like. You can also choose which of the painted foregrounds to use in the final image.
Back on your computer, you'll need some software to stack the images. My favorite is a free program called StarStax which is available for Mac, Windows and Linux.
Make any necessary adjustments to your images then load the images you want to use into StarStax and compile them into one image. You'll probably want to make more adjustments to the stacked image. This is also a good time take your best foreground image and layer it in using photoshop. The possibilities are endless.
Here are some examples of stacked star trail images and my approximate settings.
f/3.5, ISO 1600, 16 minutes
I used magnesium firesteel to illuminate the rocks.

f/3.5, ISO 400, roughly 30 minutes
There was a full moon rising over my shoulder, hence the lower ISO. The light streak in the foreground is my headlamp as I walked through the last 30 second exposure.

f/3.5, ISO 1000, roughly 30 minutes
I started this while the sky was still just a little light after sundown to get the blue effect. There was no moonlight yet.

f/3.5, ISO 2000, roughly 30 minutes but I actually let it run for more like 2.5 hours. I just chose a smaller number of frames for the final image. The light on the rocks is from our nearby campfire.

With all those extra frames, it can be fun to make a time lapse. But that's a whole different tutorial.
Please feel free to add your tips and techniques and point out anything I might have overlooked.
If you'd like a printable version of this tutorial to take with you, download the attached PDF:
Attachments
Last edited:

