Dori Coplien
Member
- Joined
- Jul 15, 2014
- Messages
- 51
I decided I wanted a handheld gimbal for my GoPro so I spent the winter researching. My list narrowed down to the FY-G4, FunnyGo, Z1-Rider and the Z1-Pround.
The FunnyGo eats up batteries, the FY-G4 and Rider get about 2 hours, the Pround 7.5-10.
Reviews showed way too many problems with the FunnyGo so that came off this list.
FY-G4 Pros: new improved motor, hidden wires, can be used with 3, 3+, 4 with or without attachments like the battery backpack, Optional extension tubes available for use as a pole. You buy as many as you want but to shorten, you have to unscrew the pole, easy calibration via software (PC only)
Cons: If you want to tilt the camera to face up or down, you need to stop recording and manually adjust the camera, requires a PC for calibration and needs to be calibrated more often than the Z1-Pround, if you want to use the 4 Silvers screen (or optional screen with other GoPros), it is hidden by the gimbal. It can be used upside down, but you need to reset the camera settings to “inverted”
Rider Pros: Uses standard GoPro mounts, rotate up/down buttons, can be held upside down and the camera auto-flips, both x and y axis are button controlled, can be used with 3, 3+, 4 with or without attachments like the battery backpack, easy calibration via software (PC only) or can be temporarily set in the field using the up/down buttons. (in modes 1 & 2, y axis, mode 3 x axis). Can be used with any GoPro mountable monopod or walking stick, can be held upside down and the camera auto-flips, both x and y axis are button controlled, can be used with 3, 3+, 4 with or without attachments like the battery backpack, easy calibration via software (PC only) or can be temporarily set in the field using the up/down buttons. (in modes 1 & 2, y axis, mode 3 x axis), can be held upside down and the camera auto-flips, both x and y axis are button controlled, can be used with 3, 3+, 4 with or without attachments like the battery backpack, easy calibration via software (PC only) or can be temporarily set in the field using the up/down buttons. (in modes 1 & 2, y axis, mode 3 x axis), viewing screen for the most part can be seen. Amber light lets you know if you are in mode 1, 2 or 3, blue light blinks at various speeds to indicate amount of battery charge left.
Cons: It uses the older motor and has exposed wires
Z1-Pround Pros: New motor, no exposed wires, rotate up/down buttons, can be held upside down and the camera auto-flips, both x and y axis are button controlled, can be used with 3, 3+, 4 with or without attachments like the battery backpack, easy calibration via software (PC only) or can be temporarily set in the field using the up/down buttons. (in modes 1 & 2, y axis, mode 3 x axis), includes USB adapter so you can charge your GoPro as you use it, has optional cabled remote and extension pole (expands to ~4 feet). The FunnyGo also has a serial port but it’s used for an optional Bluetooth adapter and app. Awesome combo I wish the Pround had. viewing screen for the most part can be seen. Amber light lets you know if you are in mode 1, 2 or 3, blue light blinks at various speeds to indicate amount of battery charge left
Cons: The extension pole is less than stellar.
I really preferred to Z1-Rider and hoped a new version with the improved motor and hidden cables would be available by spring but so far, that isn’t the case so I purchased the Z1-Pround, remote cable and pole.
I won’t post a demo video here as there are plenty available on youtube but I can tell you I love the gimbal. It was calibrated when it arrived but I did recalibrate it just to see how hard it was. Only took about 2 minutes. (Make sure you turn anti-virus off). Couldn’t get the firmware to update via a Win8.1 PC so I tried another (also 8.1) and it worked. Turns out it already had the latest firmware. Installing the USB driver was also no problem.
I added a phone holder to the pole and usually use the GoPro app rather than a GoPro viewer, the USB cable keeps my GoPro at full charge. (I used it as least 6 hours and still had a fully charged battery)
The extension pole seems quite sturdy, has an on/off button, but it has one minor and one major flaw.
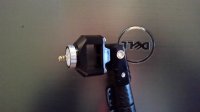
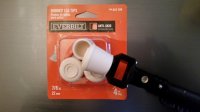
To attach it, you remove the battery cap from the gimbal and the screw the gimbal onto the pole. The spring (like one used behind the batteries in a flashlight) is on the pole. The minor flaw is that it doesn’t have a protection cap to protect the spring and threads (aluminum) when not in use. I solved that with a 7/8” rubber chair leg protector. I also use it on the cap when it’s not is use.
Due to the weight of the gimbal, camera and batteries, to prevent toque on the threads, you tilt the front portion up so the weight on the threads is always straight down. The angle is adjustable so you do not need to hold the pole parallel to the ground.
The major flaw is that you can’t rotate the position of the head. The gimbal always sees the side opposite the controls as “forward”. When screwed onto the pole, what should be in the 12 o’clock is now in the 11 o’clock position. It’s no problem when holding the pole straight up as you can simply turn it in your hand. Extending the pole magnifies the problem. I cannot face due north and point the pole due north. You can’t hold the pole 45 degrees to left can have the camera face the same direction unless you are in mode 3. In mode 3 you can't use the buttons to rotate up/down. This may not sound like much of a problem but trying to 1) get your subject lined up and 2) keep it lined up, especially while walking takes a tremendous amount of practice.
Due to the problems with the pole, really wished I had waited for a new version of the rider but overall I would highly recommend the Z1-Pround, just not the pole. Nice steady footage.
The FunnyGo eats up batteries, the FY-G4 and Rider get about 2 hours, the Pround 7.5-10.
Reviews showed way too many problems with the FunnyGo so that came off this list.
FY-G4 Pros: new improved motor, hidden wires, can be used with 3, 3+, 4 with or without attachments like the battery backpack, Optional extension tubes available for use as a pole. You buy as many as you want but to shorten, you have to unscrew the pole, easy calibration via software (PC only)
Cons: If you want to tilt the camera to face up or down, you need to stop recording and manually adjust the camera, requires a PC for calibration and needs to be calibrated more often than the Z1-Pround, if you want to use the 4 Silvers screen (or optional screen with other GoPros), it is hidden by the gimbal. It can be used upside down, but you need to reset the camera settings to “inverted”
Rider Pros: Uses standard GoPro mounts, rotate up/down buttons, can be held upside down and the camera auto-flips, both x and y axis are button controlled, can be used with 3, 3+, 4 with or without attachments like the battery backpack, easy calibration via software (PC only) or can be temporarily set in the field using the up/down buttons. (in modes 1 & 2, y axis, mode 3 x axis). Can be used with any GoPro mountable monopod or walking stick, can be held upside down and the camera auto-flips, both x and y axis are button controlled, can be used with 3, 3+, 4 with or without attachments like the battery backpack, easy calibration via software (PC only) or can be temporarily set in the field using the up/down buttons. (in modes 1 & 2, y axis, mode 3 x axis), can be held upside down and the camera auto-flips, both x and y axis are button controlled, can be used with 3, 3+, 4 with or without attachments like the battery backpack, easy calibration via software (PC only) or can be temporarily set in the field using the up/down buttons. (in modes 1 & 2, y axis, mode 3 x axis), viewing screen for the most part can be seen. Amber light lets you know if you are in mode 1, 2 or 3, blue light blinks at various speeds to indicate amount of battery charge left.
Cons: It uses the older motor and has exposed wires
Z1-Pround Pros: New motor, no exposed wires, rotate up/down buttons, can be held upside down and the camera auto-flips, both x and y axis are button controlled, can be used with 3, 3+, 4 with or without attachments like the battery backpack, easy calibration via software (PC only) or can be temporarily set in the field using the up/down buttons. (in modes 1 & 2, y axis, mode 3 x axis), includes USB adapter so you can charge your GoPro as you use it, has optional cabled remote and extension pole (expands to ~4 feet). The FunnyGo also has a serial port but it’s used for an optional Bluetooth adapter and app. Awesome combo I wish the Pround had. viewing screen for the most part can be seen. Amber light lets you know if you are in mode 1, 2 or 3, blue light blinks at various speeds to indicate amount of battery charge left
Cons: The extension pole is less than stellar.
I really preferred to Z1-Rider and hoped a new version with the improved motor and hidden cables would be available by spring but so far, that isn’t the case so I purchased the Z1-Pround, remote cable and pole.
I won’t post a demo video here as there are plenty available on youtube but I can tell you I love the gimbal. It was calibrated when it arrived but I did recalibrate it just to see how hard it was. Only took about 2 minutes. (Make sure you turn anti-virus off). Couldn’t get the firmware to update via a Win8.1 PC so I tried another (also 8.1) and it worked. Turns out it already had the latest firmware. Installing the USB driver was also no problem.
I added a phone holder to the pole and usually use the GoPro app rather than a GoPro viewer, the USB cable keeps my GoPro at full charge. (I used it as least 6 hours and still had a fully charged battery)
The extension pole seems quite sturdy, has an on/off button, but it has one minor and one major flaw.
To attach it, you remove the battery cap from the gimbal and the screw the gimbal onto the pole. The spring (like one used behind the batteries in a flashlight) is on the pole. The minor flaw is that it doesn’t have a protection cap to protect the spring and threads (aluminum) when not in use. I solved that with a 7/8” rubber chair leg protector. I also use it on the cap when it’s not is use.
Due to the weight of the gimbal, camera and batteries, to prevent toque on the threads, you tilt the front portion up so the weight on the threads is always straight down. The angle is adjustable so you do not need to hold the pole parallel to the ground.
The major flaw is that you can’t rotate the position of the head. The gimbal always sees the side opposite the controls as “forward”. When screwed onto the pole, what should be in the 12 o’clock is now in the 11 o’clock position. It’s no problem when holding the pole straight up as you can simply turn it in your hand. Extending the pole magnifies the problem. I cannot face due north and point the pole due north. You can’t hold the pole 45 degrees to left can have the camera face the same direction unless you are in mode 3. In mode 3 you can't use the buttons to rotate up/down. This may not sound like much of a problem but trying to 1) get your subject lined up and 2) keep it lined up, especially while walking takes a tremendous amount of practice.
Due to the problems with the pole, really wished I had waited for a new version of the rider but overall I would highly recommend the Z1-Pround, just not the pole. Nice steady footage.
Attachments
Last edited: