Navigation
Install the app
How to install the app on iOS
Follow along with the video below to see how to install our site as a web app on your home screen.
Note: This feature may not be available in some browsers.
More options
You are using an out of date browser. It may not display this or other websites correctly.
You should upgrade or use an alternative browser.
You should upgrade or use an alternative browser.
Album Photo Processing Comparisons
- Thread starter Nick
- Start date
John Fowler
Member
- Joined
- Jan 17, 2012
- Messages
- 217
Why did you feel the need to add fog?
That part of the sky on the lower right was too bright for me. I tried cloning some clouds over it and then got the idea that I could use the Nik graduated fog filter with a mask to just soften the whole far horizon. This softness served to complement and enhance the hard features of the Watchman mountain.
Duke
Mountain Carver
- Joined
- Feb 19, 2012
- Messages
- 382
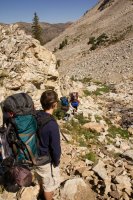
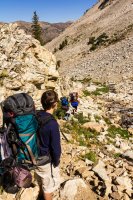
Nooo WAY am I going to post any of my landscape shots with you photographers on here. But, I want this thread to start up again and since no one else is posting.....I guess I have to put something up to revive it. So, this post doesn't follow Nick's admonition to post pics that are significantly different after processing, but here is a regular, run of the mill, backpack shot. I did process a bit. Not much change but the difference to note is what the lens correction setting in lightroom 4 did. On some of my shots it makes little difference and in some it really flattens them out. Often I didn't realize how much bow the wide angle had put on them. Much easier to see when I am looking at a before after, one on top of the other on my screen, but I think you can see it side by side too.
edit: started with a RAW, that I converted to jpeg just to post. Then "processed" the raw in LR4 and exported as a jpeg. that is what the two shots are.
wnorton
Member
- Joined
- Jul 28, 2012
- Messages
- 77
Here's one more point to consider. There really is no "straight out of the camera" format. All digital camera's put post editing into the photos. You can take the exact same photo with 5 different cameras and you will get five different shots. The most altered elements of digital pics is color vibrancy, handling of dark shadows, and sharpness.
The exception is when shooting in RAW format. But honestly NO ONE would ever shoot RAW and then share, post, or print it without some post processing editing.
Serious photographers learn and use PhotoShop but at a minimum you should learn and use a tool light LightRoom (or other such tool)
My 2 cents worth.
Wade
PS: while I'm on the soap-box, stop using Instagram... That's the worst photos you'll ever see.
From wnorton using an iPad and Tapatalk HD.
- Joined
- Aug 9, 2007
- Messages
- 12,950
(I hope you can tell that I jacked up my file upload and the pics are After / Before instead of Before After like they should be)
I switched them so that the before is now on top, then after.
Duke
Mountain Carver
- Joined
- Feb 19, 2012
- Messages
- 382
Here is the SOOC, shot I got with my Canon 550D, shot in RAW.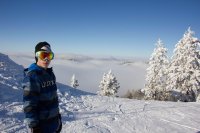
PProcessing done in LR4. The first thing i do is check the lens correction profile box and then "remove chromatic aberration", both in the Lens Correcton section. Then I go to the basic section. Below is a screenshot of the changes I made. i wish I had more rhyme and reason as to why I set them at these points but it just personal pref.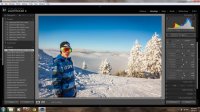
In the left you will see the history and see that I was attempting to bring out cloud detail but kept erasing each attempt. This screenshot has some of my cloud attempts still intact.
Next I did some dodge & burn with the brush. Recently i watched a youtube tutorial by some weird, French guy that showed how brushing and removing detail from snow will smooth it out and make it look better. This snow had too much detail and it didn't seem to work in this shot so I left the choppy look. I think it is either smooth or don't smooth but trying to smooth out something sooo choppy doesn't work too well.
Some sharpening in the Detail section and then just a bit of Post-Crop Vignetting in the Effects section and that is about it. However what i did not include is that I keep making a change and then undoing that change and then trying something else, etc. At this stage in my photo learning i would call my post processing irreproducable; meaning that if I were to wait a week and then start from scratch I would probably end up with something a bit different.
I am a bit shy about posting shots on here but am asking for critique on this so don't worry about comments. I am hoping for them. Thank you.
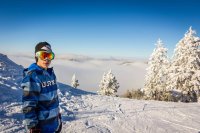

PProcessing done in LR4. The first thing i do is check the lens correction profile box and then "remove chromatic aberration", both in the Lens Correcton section. Then I go to the basic section. Below is a screenshot of the changes I made. i wish I had more rhyme and reason as to why I set them at these points but it just personal pref.

In the left you will see the history and see that I was attempting to bring out cloud detail but kept erasing each attempt. This screenshot has some of my cloud attempts still intact.
Next I did some dodge & burn with the brush. Recently i watched a youtube tutorial by some weird, French guy that showed how brushing and removing detail from snow will smooth it out and make it look better. This snow had too much detail and it didn't seem to work in this shot so I left the choppy look. I think it is either smooth or don't smooth but trying to smooth out something sooo choppy doesn't work too well.
Some sharpening in the Detail section and then just a bit of Post-Crop Vignetting in the Effects section and that is about it. However what i did not include is that I keep making a change and then undoing that change and then trying something else, etc. At this stage in my photo learning i would call my post processing irreproducable; meaning that if I were to wait a week and then start from scratch I would probably end up with something a bit different.
I am a bit shy about posting shots on here but am asking for critique on this so don't worry about comments. I am hoping for them. Thank you.

- Joined
- May 5, 2012
- Messages
- 1,725
Thanks for joining in the discussion Duke. The best way to learn is to shoot, process, critique and then do it all over again.
The Photomatix effect you mentioned in the other thread is the result of three things you did in LR. First you boosted the shadows, making the darks lighter. Second you pumped the vibrance way up and third you juiced the clarity. So the darks are lighter and have more color luminosity, then overall the image has more saturated colors and finally the tones are smoothed by a healthy dose of microcontrast. None of these are bad things but in concert they do give a plastic-y feel.
My suggestion would be starting out, leave the sliders at default levels unless you need them to fix a specific problem. Instead, focus on tweaking the tone curves. They're more abstract than simple sliders, but also far more flexible.
For the composition, consider the location of the horizon. Running the horizon straight through the middle of the frame is what our brains tend to default to... but it makes for fairly plain pictures. Next time try putting the horizon on the third (either 1/3 or 2/3 the way up the frame). A cool way to do that with this shot would be to crouch and angle the lens slightly up at your son. The wide angle and low point of view would make him look bigger, reducing some of the otherwise plain blue sky.
- Joined
- May 19, 2012
- Messages
- 1,990
I like your shot and the processing. Perhaps the trees on the right are just a tad over exposed.
BTW I don't feel there are any rules relating to composition, if you feel at the time of exposure that the horizon should be in the center, by all means put it there. Also a wide angle looking up at your son would make him look distorted.
My $.02.
BTW I don't feel there are any rules relating to composition, if you feel at the time of exposure that the horizon should be in the center, by all means put it there. Also a wide angle looking up at your son would make him look distorted.
My $.02.
- Joined
- Aug 9, 2007
- Messages
- 12,950
Here's one from last year that I did some experimenting with in Nik Color Efex Pro. Yes, this is bordering on unicorns, but it was a fun way to see how powerful the filters in that software are. I use it as a plug-in for Aperture/Lightroom.
Straight out of the camera:
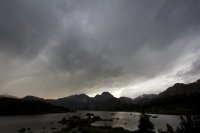
Processed in Aperture and the Nik plugins:
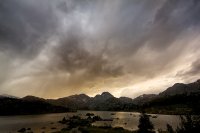
Straight out of the camera:

Processed in Aperture and the Nik plugins:

Duke
Mountain Carver
- Joined
- Feb 19, 2012
- Messages
- 382
come on now, I know there are more of you with some examples to post. But, maybe it is best for a noob like me to stow the ego and post some .....shall we say...less than perfect examples and you can give your two bits on what you would have done. Just one more and I'll stop before I end up hijacking this thread.....but I can't help it I think this is a great thread.
So here is one I just snapped. My boy (same as in previous 2 because he is the only one of my 5 kids that will even contemplate letting me snap a few shots) was just sitting at the table this morning and my camera was right there on the table. So, I clicked of 5 or 6 before he realized it and gave me the "knock it off Dad". I knew it would be a tough setting with the sun coming in through blinds. Here are before and after.
SOOC:
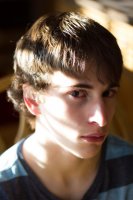
After PP:
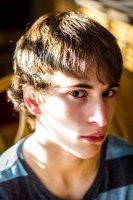
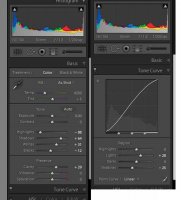
No need for the usual, kind words and niceties. I can see that this didn't work so well and in fact one could make a good argument that the original SOOC is just as good if not better. I am interested in hearing what you might have done and how the rest of you handle a high range like this for a single shot. Below is a shot showing some of the LR settings. the histogram makes it clear that this shot is beyond range and in fact this likely is one of the rare times (for me) when it would have been best to shoot a bracket set and HDR merge. By rare I mean that last fall i was going crazy trying to HDR everything. My laziness took over and I backed off, only to realize that maybe it is rare in my shooting that I would benefit from doing so quite as often as I was. However, this is my attempt to correct a single (out of range in my opinion) shot. What you won't see in the below is the brush work. I brushed the face and removed clarity and sharpness. I brightened the eye camera right. It looked freaky so I went in and erased the brush from the iris and then it worked OK. I tried to brush away some of the shadows on his face but it didn't work too well. I backed that off a bit and it is so/so like this. By brush off I don't mean clone I mean brush and then jack around with the exposure, contrast, etc. I also corrected for the lens which incidentally is the Canon 50mm 1:1.8 II attached to a 550D.
Based on previous feedback I did try to adjust the curve but don't really know what I am doing with it. I tried to give it the S shape, but only know that doing so is common and really have no idea why. The curve itself seemed a bit fixed and wasn't letting me move it too much. Even LR4 is fighting me on this.
So here is one I just snapped. My boy (same as in previous 2 because he is the only one of my 5 kids that will even contemplate letting me snap a few shots) was just sitting at the table this morning and my camera was right there on the table. So, I clicked of 5 or 6 before he realized it and gave me the "knock it off Dad". I knew it would be a tough setting with the sun coming in through blinds. Here are before and after.
SOOC:

After PP:

No need for the usual, kind words and niceties. I can see that this didn't work so well and in fact one could make a good argument that the original SOOC is just as good if not better. I am interested in hearing what you might have done and how the rest of you handle a high range like this for a single shot. Below is a shot showing some of the LR settings. the histogram makes it clear that this shot is beyond range and in fact this likely is one of the rare times (for me) when it would have been best to shoot a bracket set and HDR merge. By rare I mean that last fall i was going crazy trying to HDR everything. My laziness took over and I backed off, only to realize that maybe it is rare in my shooting that I would benefit from doing so quite as often as I was. However, this is my attempt to correct a single (out of range in my opinion) shot. What you won't see in the below is the brush work. I brushed the face and removed clarity and sharpness. I brightened the eye camera right. It looked freaky so I went in and erased the brush from the iris and then it worked OK. I tried to brush away some of the shadows on his face but it didn't work too well. I backed that off a bit and it is so/so like this. By brush off I don't mean clone I mean brush and then jack around with the exposure, contrast, etc. I also corrected for the lens which incidentally is the Canon 50mm 1:1.8 II attached to a 550D.
Based on previous feedback I did try to adjust the curve but don't really know what I am doing with it. I tried to give it the S shape, but only know that doing so is common and really have no idea why. The curve itself seemed a bit fixed and wasn't letting me move it too much. Even LR4 is fighting me on this.

Bill
.
- Joined
- Jan 17, 2012
- Messages
- 991
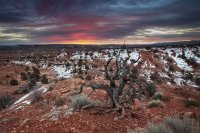
Not an amazing image but a good example of the power of tone curves and the dynamic range contained within a RAW file from the 5DMKIII
SOOC (raw to jpg)
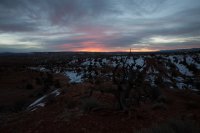
WB adjustments, basics curves, a light grad filter in LR4
3 luminosity masks in cs5
and back to LR4 for sharpening and a few other touches
total editing time was about 5min
SOOC (raw to jpg)

WB adjustments, basics curves, a light grad filter in LR4
3 luminosity masks in cs5
and back to LR4 for sharpening and a few other touches
total editing time was about 5min

Aldaron
Member
- Joined
- Jun 16, 2012
- Messages
- 1,487
WB adjustments, basics curves, a light grad filter in LR4
3 luminosity masks in cs5
and back to LR4 for sharpening and a few other touches
total editing time was about 5min
Great example. Unfortunately, this is what I read: "gobledy, gobeldy, gook. Great picture."
That's why we need to get the LR thing together! I can host it at my house if that's what's holding us up.
- Joined
- Aug 9, 2007
- Messages
- 12,950
Great example. Unfortunately, this is what I read: "gobledy, gobeldy, gook. Great picture."
That's why we need to get the LR thing together! I can host it at my house if that's what's holding us up.
The hold up is getting one of the LR studs around here involved. I'm also happy to host in SLC. neiloro is up for it but he is in India right now.
- Joined
- Aug 9, 2007
- Messages
- 12,950
I just recommended a friend read this thread and so I thought I'd bring it back to life. It's always fun to see what a photo looks like before and after processing. This one just has minor stuff done to it in Aperture. No major filters or plugins or anything. Definition, Vibrancy, Shadows/Highlights, etc.
SOOC:
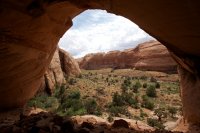
Processed:
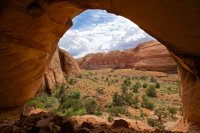
SOOC:

Processed:

Dustin Gent
Member
- Joined
- Jun 22, 2015
- Messages
- 150
forgive me for bumping this thread 
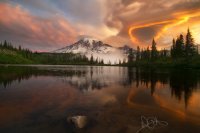
This was shot with a 1Ds, which was the first full frame DSLR. It has its' limits, but surprisingly holds detail well - if you work within the limitations. I suppose that holds true with anything.
I triple processed this in ACR and worked within smart objects. lots of layer masks, and work within Nik software as well. Yes, I realize the horizon is tilted a bit. Thank goodness the D600 has a level!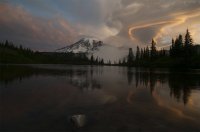


- Joined
- Aug 9, 2007
- Messages
- 12,950
forgive me for bumping this thread
Bumping threads is not only welcome, but encouraged here on BCP. Nice before and after.
- Joined
- Aug 9, 2007
- Messages
- 12,950
@Nick, arch or alcove?
Alcove. One with a blanket of mammoth dung dated back to 13,000 years ago only a meter or so under the surface.
Similar threads
Similar threads
-
-
-
-
Never-ending growing photo collection at the top of my daily hike...
- Started by Burrito
- Replies: 22
-
-
Surviving In The Wild: Can Your Photo Gear Save Your Life?
- Started by Rockskipper
- Replies: 1
-
-
-
-
-
-
-
-
-
-
-
-
-
-
-
-
-
-
-
-
-
-
-
